之前研究過使用buildroot來建立一個客製化的Linux作業系統-『buildRoot study - 建立自己的作業系統』,那時候就想說想要把buildroot給抽掉,結果經過一年多,終於有空可以繼續之前的這個研究,這次完全的將buildroot給抽掉,『Bootloader-uboot』, 『Kernel』, 『Rootfs-busybox』,『glibc』完全都自己建立,藉由此了解一個小型OS的構成。
大綱
1.Preparation Ubuntu 數莓派2 TTL Cable Enviroment 2.目標 Firmware U-boot Kernel Root FileSystem 3.Partition SD Card 4.raspberry pi 官方軔體 5.Root File System 6.Glibc 7.Kernel 8.u-boot 9.Boot-up 10. Ref1. Preparation
Ubuntu Host主機的部份,我是採用Ubuntu-16.04(x86_64),如果是其他Distributions,有些參數的話,可能就要自己注意一下去調整。數莓派2 
TTL Cable 這個天瓏書局有在賣,線怎麼接可以參考-『https://www.raspberrypi.com.tw/tag/usb-to-ttl/』。
Enviroment 1. 安裝基本的建制工具$ sudo apt-get update $ sudo apt-get install g++ make gawk -y $ sudo apt-get install git-core libncurses5-dev vim -y $ sudo apt-get install wget python unzip bc -y $ sudo apt-get install device-tree-compiler -y2 . 安裝arm cross compiler(建制『u-boot』和『busy-box』會用到)$ sudo apt-get install gcc-arm-linux-gnueabihf3. 下載相關firmware會用到subversion,所以先安裝:$ sudo apt-get install subversion4. 安裝kernel建制會用到的tool-chain 從git remote下載tool-chain$ git clone https://github.com/raspberrypi/tools可將資料夾複製到比較方便的位置,像是官方的路徑是:/tools/arm-bcm2708/gcc-linaro-arm-linux-gnueabihf-raspbian然後加入以下路徑到.bashrc底下最後一行:export PATH=:/tools/arm-bcm2708/gcc-linaro-arm-linux-gnueabihf-raspbian/bin:$PATH如果是64位元就用:export PATH=:/tools/arm-bcm2708/gcc-linaro-arm-linux-gnueabihf-raspbian-x64/bin:$PATH2. 目標
上圖是之前文章『buildRoot study - 建立自己的作業系統』裡面的開機流程圖,之前幾乎所有的文件都是由buildroot產出的,而就像剛剛所說的,這一次則是要把所有的元件都自己建制出來,元件的分類如下:
Firmware 就是上圖的『bootcode.bin』,『Start.elf』和『Fixup.dat』,雖然我們自己有建立u-boot來掌管開機,但是不幸的在pi2這邊還是無法第一站就直接交給我們的u-boot,還是必須要交給『bootcode.bin』。U-boot 主要就是『u-boot.bin』這個檔案。Kernel 主要就是『zImage』,還有『bcm2709-rpi-2-b.dtb』這個裝置樹檔案。Root FileSystem 上圖的右半邊這次我們都要自己建置,主要有兩個部份: 1. buybox 2. glibc 這整個專案小弟我寫了個簡單的makefile,如果有需要的話可以參考一下: https://github.com/hugh712/my_pi2/tree/master/my_mini_pi 但是並沒有辦法寫的很完整,沒時間在很多平台上去測試,也沒辦法reuse,只能確保跟我同一個平台上的朋友第一次建制時,應該會成功而已,所以如果有什麼使用上的問題的話,請在跟我聯絡摟。3. Partition SD Card
首先我們必須有一塊Micro SD,我們要將它分成兩個partition,其中第一個為boot section,另一個partition是放我們的rootfs的地方。 1. 假設路徑是/dev/sdd,先進入fdisk系統$ sudo fdisk /dev/sdd2. 將預設單位改成cylindersCommand (m for help): u3. 建立一個新的DOS格式的partition tableCommand (m for help): o4. 建立放boot loader的partition (以下兩步的重點是規劃200MB的boot partition,其他的都規檔案系統用)Command (m for help): n Partition type: p primary (0 primary, 0 extended, 4 free) e extended Select (default p): p (The new partition is a primary partition.) Partition number (1-4, default 1): (Press Enter for default.) Using default value 1 First cylinder (2-15193, default 2): 2 Last cylinder, +cylinders or +size{K,M,G} (2-15193, default 15193): +200M5. 建立放檔案系統的partitionCommand (m for help): n Partition type: p primary (1 primary, 0 extended, 3 free) e extended Select (default p): p (The new partition is a primary partition.) Partition number (2-4, default 2): (Press Enter for default.) Using default value 2 First cylinder (2048-15193, default 2): 2048 Last cylinder, +cylinders or +size{K,M,G} (2-15193, default 15193): 151936. 將第一個磁區標注為bootableCommand (m for help): a Partition number (1-4): 1 (Select Partition 1 to be active.)7. 將第一個磁區改為FAT32Command (m for help): t Selected partition 1 Hex code (type L to list codes): c Changed system type of partition 1 to c (W95 FAT32 (LBA))8.寫入新的partition tableCommand (m for help): w9. 格式化新的boot load磁區為DOS FAT32 檔案系統$ sudo mkfs.vfat -F32 /dev/sdd1 mkfs.vfat 3.0.13 (30 Jun 2012)10.格式化第二個磁區為ext4檔案系統$ sudo mkfs.ext4 /dev/sdd211. 如果可以的話,就順便掛載一下吧:$ sudo mkdir -p /mnt/boot $sudo mkdir -p /mnt/rtfs $sudo mount /dev/sdd1 /mnt/boot $sudo mount /dev/sdd2 /mnt/rtfs這時就要用一下我上次的表示法,一樣這時是空的兩個partitons如下:

4. raspberry pi 官方軔體
有兩種方式取得: 1. https://github.com/raspberrypi/firmware/tree/master/boot 2. https://www.raspberrypi.org/downloads/raspbian/ (第二個為Ra pi 2的image file,如果想要把相對應的檔案取出來,請看之前文章『buildRoot study - 建立自己的作業系統』) 整個firmware下載下來大個恐怖,所以我只要抓我想要的部份就好,git的話一定要一次下載全部,還好發現可以利用svn來下載git的sub folder如下:$ svn export https://github.com/raspberrypi/firmware/trunk/boot firmware抓完後我的mini_pi路徑應該會像這樣:我們需要的檔案只有: start*.elf (GPU frimware) bootcode.bin ( bootloaders) Fixup.dat (一些修正檔) 但是應為我很懶,所以就直接將裡面的資料都複製到『/mnt/boot』底下:
$ sudo cp firmware/* /mnt/boot
5. Root File System
Root File System的想法還是跟buildroot一樣,是使用busybox 來處理大部分user space的需求,流程如下: 1. 取得source code,branch為『1_26_stable』$ git clone git://git.busybox.net/busybox -b 1_26_stable2. 設定default config
$ cd busybox $ make ARCH=arm CROSS_COMPILE=arm-linux-gnueabihf- defconfig如果你還想要修改任何設定的話,請用menuocnfig:$ make ARCH=arm CROSS_COMPILE=arm-linux-gnueabihf- menuconfig3. 建制專案並且安裝$ make ARCH=arm CROSS_COMPILE=arm-linux-gnueabihf- $ make ARCH=arm CROSS_COMPILE=arm-linux-gnueabihf- install上面那個target『install』會在busybox的根目錄下安裝所有的輸出,你會發現多了一個資料夾叫做『_install』,內容的話就跟底下差不多:當然是如果你有想要安裝的路徑你也可以用『CONFIG_PREFIX』來安裝,如下:$ make ARCH=arm CROSS_COMPILE=arm-linux-gnueabihf- install CONFIG_PREFIX=/path/to/folder4. 建立其他的資料夾: 這時切換到剛剛的輸出資料夾『_install』底下,如同剛剛看到的,他的內容並不完全,也無法當成一個小型的root file system,所以這時需要建立其他的檔案和資料夾:$ cd _install $ mkdir bin sbin lib etc dev sys proc tmp var opt mnt usr home root media5. 並於『etc』下面建立其他的資料夾和空的設定檔:$ cd etc touch inittab touch fstab touch profile touch passwd touch group touch shadow touch resolv.conf touch mdev.conf touch inetd.conf mkdir rc.d mkdir init.d touch init.d/rcS chmod +x init.d/rcS mkdir sysconfig touch sysconfig/HOSTNAME6. 於『etc/inittab』寫入底下資料:::sysinit:/etc/init.d/rcS ::askfirst:-/bin/sh ::ctrlaltdel:-/sbin/reboot ::shutdown:/bin/umount -a -r ::restart:/sbin/init底下這個是官方的example還有解釋,這邊就請自己看吧,沒多少內容,也很簡單: https://git.busybox.net/busybox/tree/examples/inittab 7. 修改『etc/init.d/rcS』:#!/bin/sh PATH=/sbin:/bin:/usr/sbin:/usr/bin runlevel=S prevlevel=N umask 022 export PATH runlevel prevlevel mount -a mkdir /dev/pts mount -t devpts devpts /dev/pts echo /sbin/mdev > /proc/sys/kernel/hotplug mdev -s /bin/hostname -F /etc/sysconfig/HOSTNAME ifconfig eth0 192.168.1.788. 於『etc/fstab』裡面加入底下內容:proc /proc proc defaults 0 0 sysfs /sys sysfs defaults 0 0 tmpfs /var tmpfs defaults 0 0 tmpfs /tmp tmpfs defaults 0 0 tmpfs /dev tmpfs defaults 0 09. 於『dev』底下建立基本的裝置:cd dev mknod console c 5 1 chmod 777 console mknod null c 1 3 chmod 777 null10. 將所有資料複製到剛剛建立出來的file system partition裡面:$ sudo cp -rf _install/* /mnt/rtfs這一步之後,已經有『firmware』和一個小型的『root file system』了,表示圖如下:6. Glibc
剛剛建立的busybox如果沒有相對應的函式庫的話,使用上會有問題,所以下一步需要建立的是負起跟kernel溝通的函式庫,這邊採用的是『glibc』,建制流程如下: 1. 下載tarball,並解壓縮,版本是採用『2.25』:mkdir glibc wget http://ftp.gnu.org/gnu/libc/glibc-2.25.tar.xz -P glibc cd glibc tar -xJf glibc-2.25.tar.xz2. 建立建制資料夾,並且建制default configexport TARGET=arm-linux-gnueabihf mkdir glibc-build cd glibc-build/ ../glibc-2.25/configure $TARGET --target=$TARGET --build=$MACHTYPE --prefix= --enable-add-ons3. 建制glibcmake4. 將glibc安裝到root file system的partition上:$ sudo make install install_root=/mnt/rootfs7. Kernel
接下來這一步要件置的是『Kernel』,流程如下: 1. 取得source code,branch是『rpi-4.9.y』。$ git clone --depth=1 https://github.com/raspberrypi/linux -b rpi-4.9.y2. 設定default config$ cd linux $ make ARCH=arm CROSS_COMPILE=arm-linux-gnueabihf- bcm2709_defconfig3. 建制專案,包含『zImage』,所有的modules,和dtbs(裝置樹檔案)$ make ARCH=arm CROSS_COMPILE=arm-linux-gnueabihf- zImage modules dtbs4. 安裝相關模組到root file system上$ sudo make ARCH=arm CROSS_COMPILE=arm-linux-gnueabihf- INSTALL_MOD_PATH=/mnt/rtfs modules_install5. 複製kernel和DTB(Device Tree blobs)到boot partition上$ sudo cp arch/arm/boot/dts/*.dtb /mnt/boot/ $ sudo cp arch/arm/boot/dts/overlays/*.dtb* /mnt/boot/overlays/ $ sudo cp arch/arm/boot/dts/overlays/README /mnt/boot/overlays/8. u-boot
其實實際上不需要這個u-boot,這個自製的OS也是可以運作,因為firmware裡面的『bootcode.bin』就算是一個可以用的bootloader了,但是既然要自製了,那當然就是連bootloader也自己來阿,比較有快感XD。 1. 下載 source code,並且checkout到tag版本『v2017.03-rc3』$ git clone git://git.denx.de/u-boot.git $ cd u-boot $ git checkout tags/v2017.03-rc3 -b v2017.03-rc32. 設定default config$ make ARCH=arm CROSS_COMPILE=arm-linux-gnueabihf- rpi_2_defconfig3. 建制u-boot$ make ARCH=arm CROSS_COMPILE=arm-linux-gnueabihf- all4. build完之後,會產生一個『u-boot.bin』,將這個『u-boot.bin』放到boot section裡:$ sudo cp u-boot.bin /mnt/boot/5. 修改『config.txt』和『cmdline.txt』 在boot section裡,加入兩個檔案,『config.txt』和『cmdline.txt』,在檔案config.txt最下面加入:kernel=u-boot.bin這樣『bootcode.bin』才會將控制權交給我們建出來的『u-boot』,而不是交給預設的『kernel』。而『cmdline.txt』則是要傳給kernel的相關參數,這兩個檔案可以參考一下我的檔案: https://github.com/hugh712/my_pi2/blob/master/my_mini_pi/configs/cmdline.txt https://github.com/hugh712/my_pi2/blob/master/my_mini_pi/configs/config.txt 在這個步驟後,理論上我們的拼圖已經湊齊如下圖了。9. Boot-up
1. 啟動終端機程式 先安裝終端機$ sudo apt-get install screen然後啟動終端機,serial port的介面因人而異,我這邊是/dev/ttyUSB0,BR是115200$ sudo screen /dev/ttyUSB0 115200插上電後,終端機就會開始出現log了,如下2. 手動開機 第一次可以先手動開機,藉由一個指令一個指令去了解做了什麼事。# Tell Linux that it is booting on a Raspberry Pi2 setenv machid 0x00000c42 # Set the kernel boot command line setenv bootargs "earlyprintk console=tty0 console=ttyAMA0 root=/dev/mmcblk0p2 rootfstype=ext4 rootwait noinitrd" # Save these changes to u-boot's environment saveenv # Load the existing Linux kernel into RAM fatload mmc 0:1 ${kernel_addr_r} zImage fatload mmc 0:1 ${fdt_addr_r} bcm2709-rpi-2-b.dtb # Boot the kernel we have just loaded bootz ${kernel_addr_r} - ${fdt_addr_r}上個畫面最後一步『Enter』給它按下去後,理論上你就可以看到一堆log了。最後會停在下面這個畫面上:


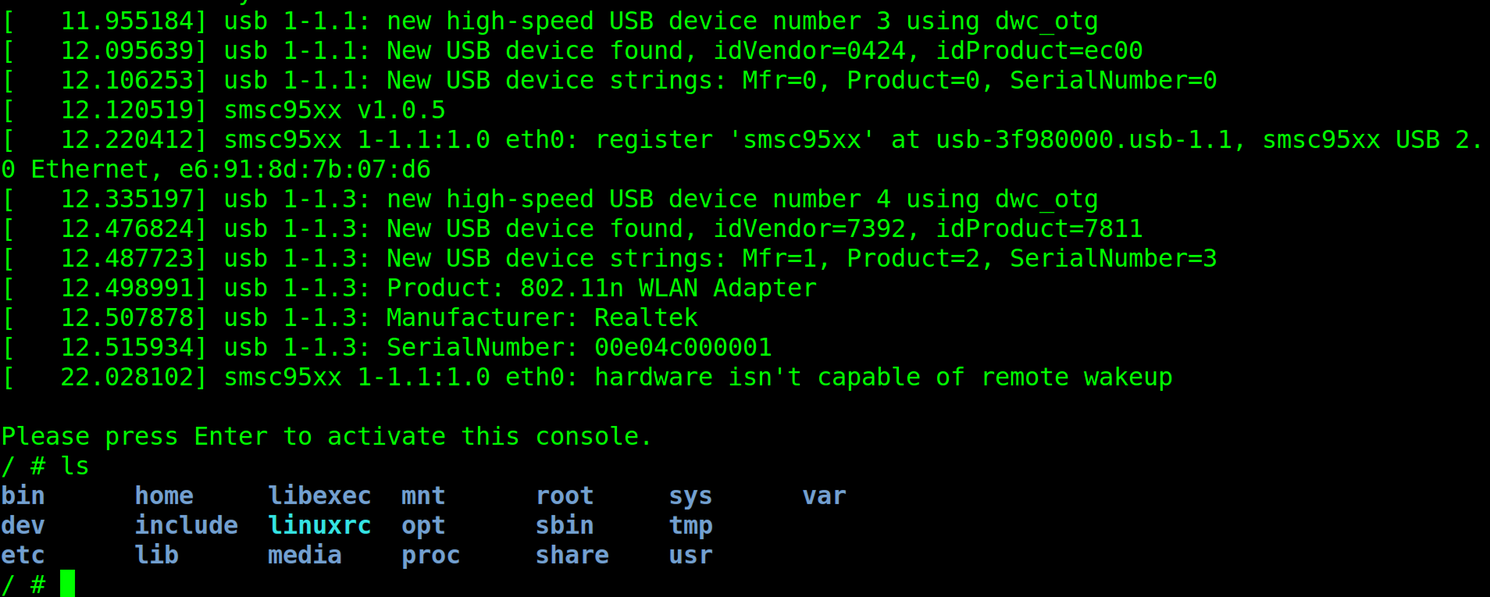
最後這個u-boot的開機步驟其實跟上一篇文章的差不多,唯一的差異就是要特別指定『dtb』,不然會無法成功的交接給kernel, 開機流程的話,因為上一篇文章已經有講解過了,所以這邊比較著重於將每個元件拼起來,不著重於流程,有需要的可以參考我上一篇文章摟。10. Ref
a. Booting a Raspberry Pi2, with u-boot and HYP enabled b. Embedded Linux 嵌入式系統開發實務 c. RPi Serial Connection d. RPI U-boot e. buildroot f. Preparing a bootable SD card g. elinux.org_RPi_Advanced_Setup h. how-the-raspberry-pi-boots-up i. Raspberry Pi Kernel Compilation j. Loading Images with U-Boot k. Raspberry_Pi_Kernel_Compilation l. Raspberry_Pi_Kernel_Compilation_2 j. Cross_Compiling_BusyBox_for_ARM k. http://elinux.org/RPi_U-Boot
請問你有試過在raspberry pi3 bare metal programming嘛?,已經將firmware 資料夾裡面的東西都放到我的SD卡了,不過不知道怎麼寫出一個可以讓LED亮起來的kernel.img,請問有什麼建議嘛?
ReplyDeleteHi,
Delete哪個LED?
如果是on board的led,可以參考一下這一篇
Deletehttps://www.raspberrypi.org/forums/viewtopic.php?f=31&t=12530
請問你有試過在raspberry pi3 bare metal programming嘛?,已經將firmware 資料夾裡面的東西都放到我的SD卡了,不過不知道怎麼寫出一個可以讓LED亮起來的kernel.img,請問有什麼建議嘛?
ReplyDelete